How To Integrate WooCommerce With eCourierz?

The growth trajectory of people shopping online is rising day by day with the reach of internet to major parts of India. This has given rise to many small startups, home-based business and individuals who have started selling their products to the customers all over the world. With demand comes the competition. In order to survive in the industry one needs to concentrate more on retaining the existing customers than acquiring the new ones. One of the best ways to accomplish it is by fulfilling the orders timely. To do this without any lag, it’s crucial to act immediately once the order is placed. Hence eCourierz has come up with WooCommerce integration which helps the sellers to instantly ship the products to the customers through eCourierz, once the order is received.
Some of the major advantages of using WooCommerce API plugin are:
1.You can quickly book the pickup once you obtain the order placed by the customer in your dashboard, without logging into the ecourierz website.
2.Generate label and track shipment in your dashboard.
3.Save money, as you don’t have to hire a developer. Even a non-technical person can install the plugin.
4. Ship multiple orders in just a few clicks.
5. Get the benefit of comparing price offered by multiple courier companies and save money.
Installing WooCommerce plugin and integrating it to ecourierz account will help you to fulfill customer’s orders in no time. Use the eCourierz integrated WooCommerce plugin to save time and increase sales.
Downloading WooCommerce Plugin
STEP 1: Go to ship.ecourierz.com and login to your account.

STEP 2: Click on “My Dashboard” in the main panel.

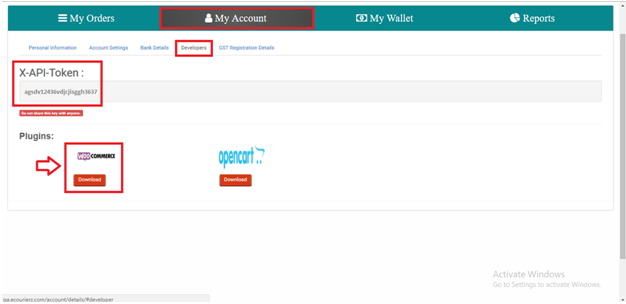
STEP 3: Click on “My Account” tab and select “Developers” option and download “Woo Commerce” plugin. Use the X-API-Token while setting up the plugin.
STEP 4: Select the latest version of the Woo Commerce plugin and download the zip file

Installing WooCommerce Plugin
STEP 5: Select the “Plugins” option in the left navigation bar and click on “Add New” button

STEP 6: Select the “Upload Plugin” button and click on the “Choose File” button to upload the zip file downloaded in the step 4. Once the zip file is uploaded click on “Install Now”

STEP 7: Now click on “Activate Plugin”

STEP 8: Once you click on “Activate Plugin” you will be redirected to a page which shows the activated plugin.

STEP 9: Select “Setting” option from the left panel of “WooCommerce”. Now select “eCourierz” tab and enter the “PARTNER-CODE” and “X-API-Token”. Select the checkbox for testing purpose and to place actual shipments disable it by “unchecking” it and click on “Save Changes”
Note:
1. Enter “Partner Code” depending on your website URL i.e.., For http: use “sellers.eshipz.com”
For https: use”ship.ecourierz.com”
1. Enter “Partner Code” depending on your website URL i.e.., For http: use “sellers.eshipz.com”
2. Use the “X-API-Token” from the Step 3

Using WooCommerce Plugin
STEP 10: Go to “WooCommerce” option in the left hand panel and select “Orders” option. You will now be able to see the orders placed by your customers. Select the “Get rate” link corresponding to the order which has to be shipped in the “eCourierz” column

STEP 11: Now select the type of Shipment which has to be delivered to the customer from the drop down i.e either “PREPAID” or “COD” and click on “select the pickup address” to enable the “Proceed” button. Now click on “Proceed” button

STEP 12: Fill all the fields related to the shipment dimensions, weight and value below and click on “Proceed” Button

STEP 13: Select the desirable courier partner from the multiple courier options and click “Book a Free Pickup”

STEP 14: You will now be directed to dashboard consisting of sender and receiver details. Check if all the details are correct and enable “Generate Label” checkbox and click “Proceed” button.
Note: If you don’t select the check box in this step, you will get a confirmation page once you click on “proceed” which has a “Generate label” button. Click on it to generate and download the label.

STEP 15: Booking confirmation page will be displayed with details like booking id, tracking no and “Download Label” link. Click on the link to download the label and affix it on the shipment

STEP 16: In order to track your shipment’s journey, click on the “Track” option in the “orders” dashboard

NOTE: You can also check your order details and tracking of your shipment in the dashboard of ship.ecourierz.com
Happy Shipping!!


Comments
Post a Comment